Abstract
How do we record sound? How do we measure sound? How do we modify sound? How do we recreate sound?
Why does the same song sound different at home, or in the car, or over ear buds from my phone?
Come along as we look at how sound is converted into electrons, recorded onto media, manipulated, and finally spit out to our ears. What we take for granted when listening to music, is really a wonder of complexity, but moves our ears to joy.
Converting sound to electrons
In a previous talk we discussed what sound was. Now we are going to discuss how sound is converted from acoustic energy into electrical energy.
Listening to live sounds is a pleasure, but since we have been able to record sound we have greatly expanded the amount of sound we can hear. Today we take for granted recorded sound, but was is the history of recorded sound.
The History of recording
In this video we saw that the early recording deviced carved the vibrations directly into a surface. This is the principal behind the original wax cylinder recordings. Later this was refined into the record disc. But the field really started to take off with the ability to convert sound to electricity.
Interaction of Magnets and Electron movements
Turning a current into a magnet
Before we start discussing microphones and speakers, I wanted to give you a small lesson about the relationship between a magnet and current flowing in a wire. This principle is common to all electric currents, but we are going to depend on it for sound recording.
Lets start by watching a short video about creating a magnet using electrons flowing through a wire.
Creating an electric flow with a magnet
Now we can see how running electrons through a wire creates a magnet. But did you know that the inverse is also through.
Converting movement of a coil into electric flow
Now that we understand the principals, lets apply them. If we take a diaphragm, like a small drum head, and connect a coil of wire to it. We can create an electric current flow in the wire by moving over a permanent magnet. Since the diaphragm moves back and forth, the current flow fluctuates like a sine wave. This is the principle behind a dynamic microphone.
Converting an electric flow into sound
Suppose we take the same setup of a diaphragm with a coil of wire connected to it and put a sine wave into the coil of wire. When the coil becomes a magnet it is either attracted or repelled by the permanent magnet. This is in effect a speaker. So as you can see we have the same method of converting sound to electricity or converting electricity to sound.
How a mic works
Lets start by looking at a exploded view of a dynamic microphone.
Dynamic vs Condenser microphones
Dynamic Mic
The heart of a dynamic microphone is it’s diaphragm. This is the part of the mic that vibrates with the sound waves. It needs to be a light piece of material which will resonate with a range of waves. Since it is so critical it is the part the distinguishes many dynamic microphones. The diaphragm must be connected to a coil of wire the moves near a magnet to create an electric current. Here is a picture of a dynamic mic diaphragm.
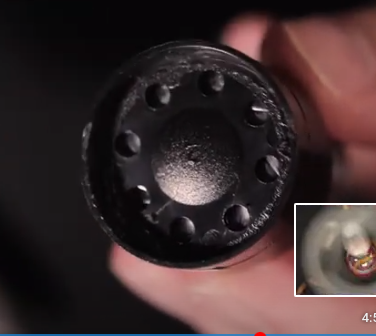
Many of the diaphragms are patented since they form a critical piece of the microphone.
Condenser Mic
The condenser mic diaphragm is slightly different in that is must be made of a metal or metal soaked material. Since the diaphragm in a condenser mic is one side of a capacitor it does not need anything attached to it. Here is a picture of a condenser microphone with it’s cover removed.
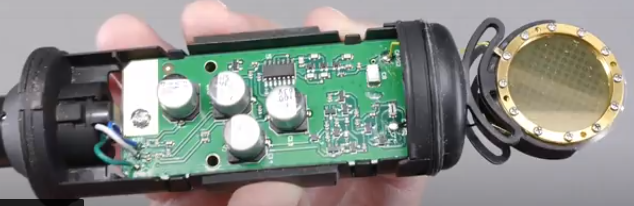
Condenser microphones come in many sizes from the mic in a cell phone, to large condenser mics with diaphragms of 1 inch or more.
Microphone uses
Dynamic mics are good for loud sounds. They are very rugged. They are less expensive. But they are not good for soft sounds. They are not as good for wide range frequency response. They are more limited in the output levels.
Condenser mics are good for wide range frequency response, and applications. They are more sensitive to softer sounds. They have a flatter dynamic range. But they are more expensive. They are more fragile. They need external power to work.
Why discuss Microphones
I suspect none of you are recording engineers, so why am I spending this time discussing microphones? The answer is that when you listen to music, the quality of the recording matters. I also wanted to give you a complete understanding of all the elements that go into a recording.
Recording Sound
Once the sound is converted to electrical waves we are able to record and reproduce the sound. Now, I know there were methods of recording sound prior to the invention of the microphone. But since they were very crude I am going to ignore them.
I am sure many of you remember the compact disc players. They made the tape recorder much easier to play. But the original reel-to-reel tape recorders were easier to use when editing the tapes.
Converting analog sound to digital sound
Today we are more familiar with listening to sound from digital devices. But how do they convert analog audio to ones and zeros.
So lets discuss how we convert analog sound to digital sound. The process looks something like this:
We have seen how the microphone converts the sound waves to electrical waves. The Low pass filter removes sound above our hearing range since there is no point including it. The sample and hold cuts the analog signal into discrete values. These slices define the quality of the sound. For most CD music the slices happen at 44,100 times per second or higher. Lower sample rates can be used to reduce output file size. The ADC (Analogue to Digital Converter) measures the height of the slice relative to a maximum value and outputs the digital value. Here is what this looks like visually.
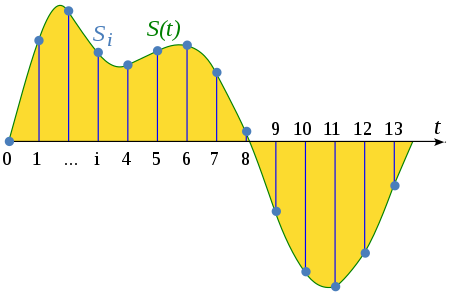
So the slicer cuts the wave into analog values, then the ADC measures the values resulting into a digital number. So we now have our analog sound converted to a format that is computer friendly.
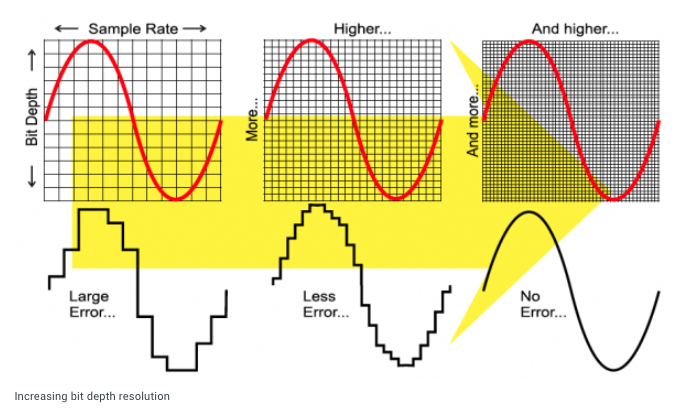
But one question is how many slices should we use to measure the wave form accurately. The higher the number of bits the more accurately we can reproduce the slice height. This is illustrated by this chart.
But the higher the sample rate the larger the output file. For a sample rate of 44,100 samples per second and a bit depth of 16 bits, the file size can be calculated as
Samples per second x number of bits per sample x seconds in a minute x 2 channels / 8 bits per byte = bytes per minute
44100 x 16 x 60 x 2 / 8 = 10,584,000 bytes per minute
Thus a 5 minute sound would take over 50 mega-bytes of space on your storage medium. Raw files like this would need a considerable amount of storage space. Remember that this came out in 1975 where 100 meg drives were considered large.
So engineers looked for a method of compressing these files, thus we turned to file encoding. The most popular type of encoding today is mp3. But how do the file sizes compare.
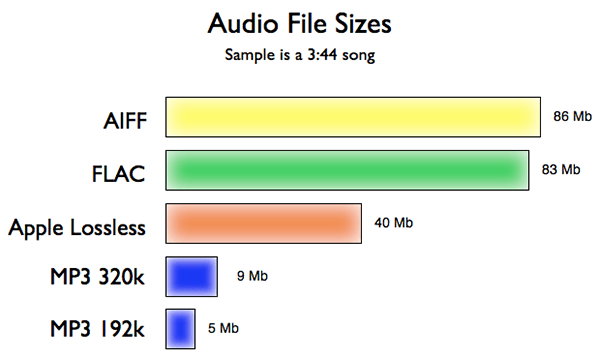
Audio file formats
Test you ears
Here is something for you to try yourself to see how good your system reproduces sound, or how good your ears are. I would suggest you run this from the website yourself. 16 vs 32 vs 64 vs 128 vs 256 KBPS MUSIC COMPARISON / SOUND QUALITY DIFFERENCE
To be Continued
This talk got to be too big. When I started planning this talk I thought it would be somewhat long, but not as long as it turned out to be. So I decided that rather than trying to cram too much information into a single talk, I would continue it until next time.
Written by John F. Moore
Last Revised: Wed 21 Sep 2022 01:50:06 PM EDT

This work is licensed under a Creative Commons Attribution-NonCommercial-ShareAlike 3.0 Unported License.