![]()
Abstract
One of the most important parts of working with microcontrollers is learning to write code. Programming is how we make use of the hardware to accomplish our task.
We are going to start learning to program the arduino using the IDE and the nano. I chose this platform first because it is easier to work with. The arduino is more limited than the raspberry pi, but the programming environment is simpler.
Getting Started with Arduino
Since there is so much good documentation on the Arduino, I am going to use their documentation.
Lets start with Learn Arduino to review how to proceed. Since I am working in Linux we will review how to work under Ubuntu. But once the install is done, the IDE works the same under windows.
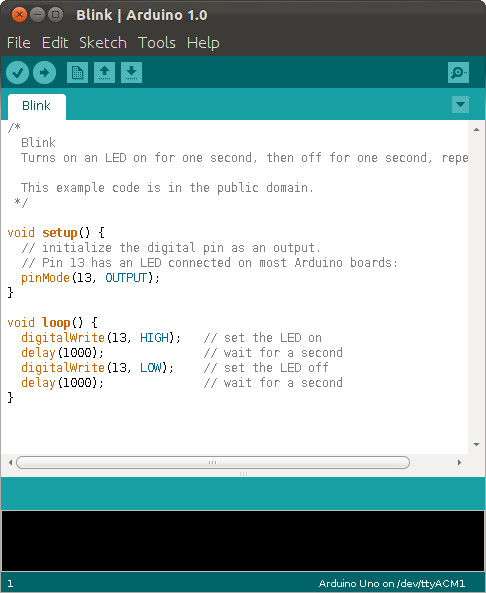
IDE (Integrated Development Environment)
Lets have a look at the development environment for the arduino.
Foundations
The Foundations section gives you some specific knowledge about the principles and techniques that are behind the Arduino platform, its whole family of boards and the software you use to tell your boards what to do. If you want to get some knowledge before you start using things, this is the right place. Foundations
We are going to quickly review the board since our focus is on programming.
- Basics
- Microcontrollers
Programming
For this proesentation we are going ot focus on the programming. The language used in the Arduino IDE is C/C++. So if you are familiar with C programming you will have an easy time. Later we will look at using C++ syntax for functions. If you want to learn C there are a number of free tutorials on the Web for the C language. But for this presenetation we will assume you are not familiar with C.
Rather than re-invent the tutorials on the Arduino we will use their explainations. But I am going to direct the learning to make it easier of those of you who are not already programmers.
Variables
Variables allow you to assign a name to a value.
int pin = 13
Where int is the type of variable, namely an integer, or whole number, pin is the name of the variable, and 13 is the value assigned to pin.
Lets look at some code:
void setup()
{
    pinMode(13, OUTPUT);
    digitalWrite(13, HIGH);
}
or I could write this as:
void setup()
{
    int pin = 13;
    pinMode(pin, OUTPUT);
    digitalWrite(pin, HIGH);
}
Written by John F. Moore
Last Revised: Fri Jan 30 01:16:28 PM EST 2026

This work is licensed under a Creative Commons Attribution-NonCommercial-ShareAlike 3.0 Unported License.